Tutorial 3: Collaborating with others on your website project
Branches, pull requests, review and merging — collaborate on a markdown site with GitHub, no developer required. Full step-by-step tutorial.


Tutorial 3: Collaborating with others on your website project
In tutorials 1 and 2 you published a site and learned to edit it locally. Now the fun part: working on it with other people without overwriting each other or breaking the live site. This is what GitHub was actually built for, and the good news is that the workflow (branches and pull requests) sounds more technical than it is.
By the end of this tutorial, you will:
- Understand what a branch is and how to create one
- Make changes safely on a branch
- Create a pull request (PR) and understand what it's for
- Review and merge a PR
- Know what to do when there's a conflict
Prerequisites: a site repository (tutorial 1) and, ideally, the local setup from tutorial 2. New terms are all in the glossary if you want them fleshed out.
First, the idea (2 minutes)
Your repository's main branch is the copy the live website is built from. A branch is a temporary parallel copy where you make changes without touching main. A pull request says "here's my branch — please review it and pull my changes into main". Once merged, the site updates.
Why bother, when you could commit straight to main? Because with more than one person (or more than trivial changes), you want a moment where changes are visible, reviewable and reversible before they're live. That moment is the PR. It's the difference between "oops, the homepage has been broken for an hour" and "good catch, fixed before merging" 😌
Step 1: Create a branch
On GitHub (easiest): go to your repository, click the branch dropdown (it says main, top-left of the file list), type a new branch name, say update-about-page, and press Enter on "Create branch". That's it 🎉
In GitHub Desktop: Branch menu → New Branch → name it → Create. Then click "Publish branch" so it exists on GitHub too.
Branch-naming convention: short, lowercase, hyphens, describing the change — add-book-reviews, fix-homepage-typo. (More tips.)
Step 2: Make your changes on the branch
In GitHub Desktop, make sure the current-branch dropdown shows your new branch (switching is one click). Then edit exactly as you learned in tutorial 2: open the folder in Obsidian, change the about page, add a page, whatever the task is.
Commit as you go, with clear messages:
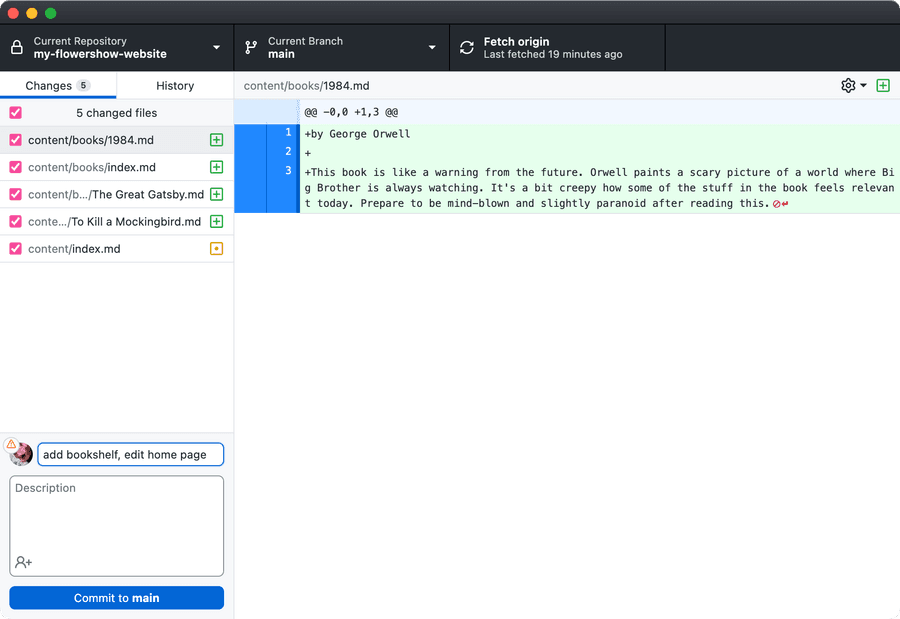
Then Push origin to send the branch's commits up to GitHub. The live site hasn't changed — your work is safely on the branch.
(Working purely in the browser? GitHub's web editor works too: while viewing a file on your branch, click the ✏️ pencil, edit, and commit to the branch when saving.)
Step 3: Open a pull request
- Go to your repository on GitHub. If you pushed recently, a yellow banner offers "Compare & pull request" — click it. (Otherwise: Pull requests tab → New pull request → select your branch.)
- Check the direction reads
base: main ← compare: your-branch. - Give the PR a clear title and a sentence or two of description: what changed and why.
- Scroll down: GitHub shows every change, additions in green, deletions in red. This diff view is the whole point: your proposed edit, laid out for anyone to see.
- Click Create pull request 🎉
Your changes are now up for review. Mention a teammate ("@sarah — look right?") in a comment if you want specific eyes.
Step 4: Review and merge
Whoever reviews (maybe you, on small teams):
- Open the PR, read the Files changed tab.
- Comment on specific lines if something needs discussion — click the line number, type, "Start review". The author pushes fixes to the same branch and the PR updates automatically. This back-and-forth is collaboration; enjoy it.
- When it's good: Merge pull request → Confirm merge. GitHub offers to delete the branch — say yes, it's disposable by design.
Watch the site rebuild. Your change is live, and the whole conversation that produced it is preserved forever on the PR 🎉
Step 5: When there's a conflict
If someone changed the same lines on main while your branch was open, GitHub flags a merge conflict on the PR. Don't panic — on a markdown site, a conflict just means two versions of some prose, and you're qualified to pick. GitHub's "Resolve conflicts" button shows both versions between <<<<<<< markers: edit the text to what it should say, delete the marker lines, mark as resolved.
The full calm-down guide, including undoing commits and other rescues: Git rescue 🚑.
The habits that make this smooth
- Small PRs. One topic per branch; a day's work, not a month's.
- Pull before you branch so you start from the latest main.
- Write real descriptions. Your reviewer, and future-you doing archaeology, will thank you.
- Direct-to-main is fine for tiny solo fixes; branches earn their keep the moment a second person, or a consequential change, appears. (When to branch.)
What's next?
You now have the full collaboration loop — the same one professional software teams run, pointed at prose. Tutorial 4 covers customising your site; or jump to what to build next.
